
Intro
Almost four months ago exactly, I broke off from a healthy, stable career in IT, and took a full-time run at personal training (my side-hustle at the time). Doing things “my way” doesn’t just mean that I don’t have a boss (side note: don’t quit your job because you hate your literal boss; he’ll be replaced with figurative bosses who are guaranteed to be just as demanding), it means that I’m completely responsible for the control over my professional environment. That’s how I was able to justify transforming my trash heap pole barn into a killer garage gym, where I could not only train my clients (right in my backyard), but also express my inner gym geek while I pursue my own fitness goals.
This post breaks down just about every piece of equipment that I have, and likely future additions.
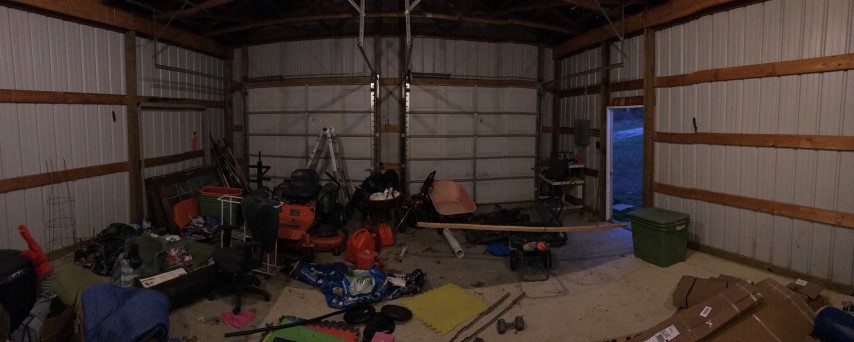
Before
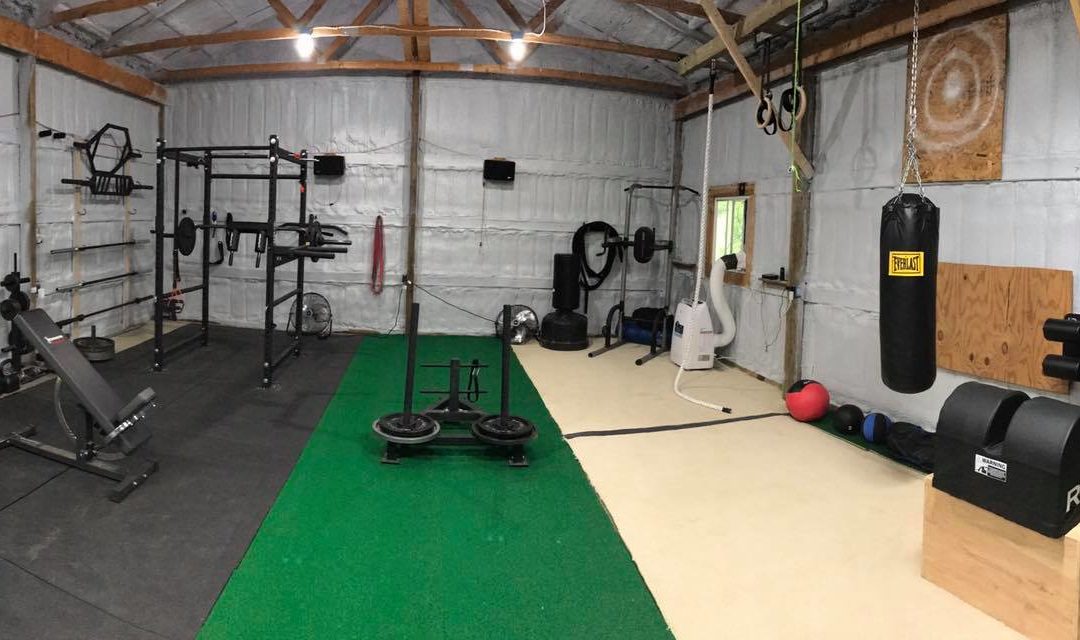
After
My Top Source for Evidence-Based Exercise Info
The Pole Barn
Once I decided that I wanted to transplant my personal training business to my home, I made the no-brainer move to convert the 700 square foot pole barn in the back yard to the training facility (that sounds nicer than “garage gym”). It’s about 100 feet from my back door, has electricity, two garage doors, and some great natural fitness equipment right outside (e.g., a hill sprint “machine”).
Before letting my garage gym ideas run wild, I had to clean everything out. The space was a glorified junk yard–that job sucked. Once the space was open, however, I was able to establish a clear vision of the toys I wanted. First things first though, the necessities…
Heating and Cooling
This bare sheet metal enclosure offered virtually zero insulation value. For a moment, I considered putting in a drop ceiling with blown insulation on top, but I ultimately decided to keep the open rafters; not very energy efficient, but it looks cool (I wear shoes with duct tape on them, and half my clothes once belonged to people who are now dead; please let me have this one thing).
After careful consideration, I decided to go with professionally applied spray foam insulation. The R value isn’t quite as high as traditional fiber glass solutions, but it packs benefits like durability, vapor and pest barriers, a slick look, and there’s nothing to wall in. I’m quite happy with it. If you have a better idea concerning what I should have done, save it for your gym.
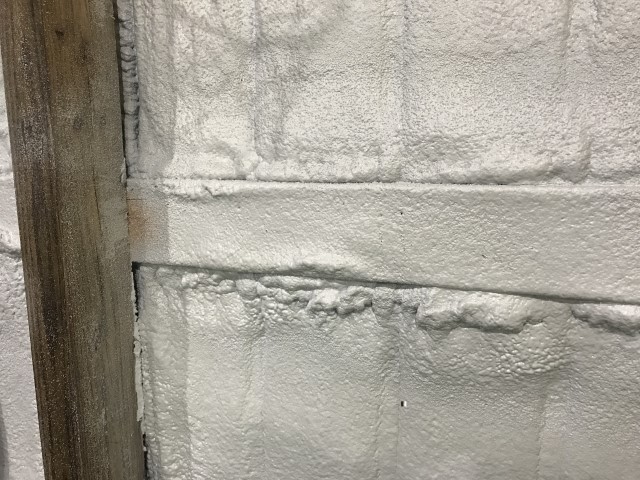
Spray foam insulation
I also needed something to help nudge the temperature in the direction of comfort. I opted for a Honeywell portable 14000 BTU heater and air conditioner. I believe it’s only rated for a 500 square foot space, and 8-10 foot ceilings, but considering the cost of more robust units, I took my chances. This unit definitely works hard–I see where the 500 square foot rating comes from. It sways the temperature about 8-10 degrees in either direction, which isn’t ideal, but 85 degrees during Tabata sets feels a lot nicer than 95 degrees. The start/sleep timer is also a nice touch. I can set the unit to kick on early in the morning before my first session, and turn off automatically after my last.
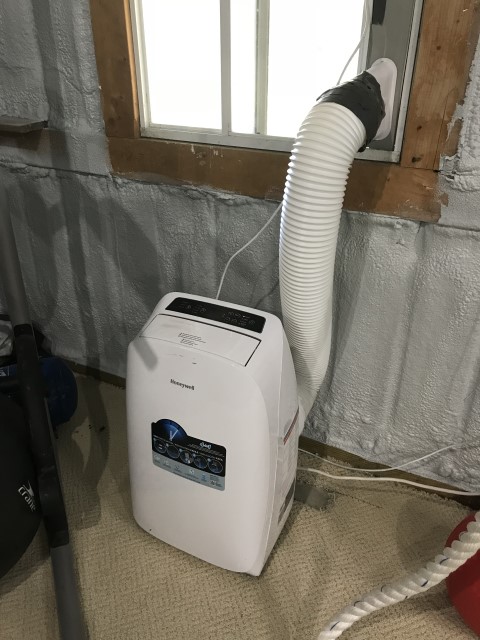
The exhaust from the Honeywell heating/cooling unit blows directly out the one available window.
To make up for its shortcomings, I also purchased a couple Lasko light-commercial fans. These little guys are obnoxiously loud (especially on the highest of three levels), but they get an incredible amount of breeze going despite their small size. They were a great supplemental investment.
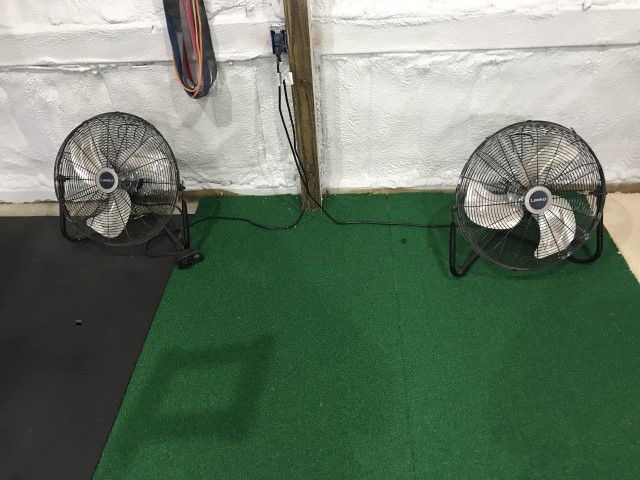
Lasko fans
Lighting
The lighting in the gym was pretty bad. There was one window, the sky light was covered up with spray foam insulation, and the two garage doors–despite offering tons of natural light when open–almost always stay closed to keep the desired temperature in and the local fauna out (two dogs, two cats, and a host of woodland creatures).
I replaced the old filament bulbs with four 100W daylight LED bubs, and two four foot 4800 Lumens shop lights, which plug directly into the rafter-mounted outlets. This change made a dramatic difference; especially the addition of the shop lights.
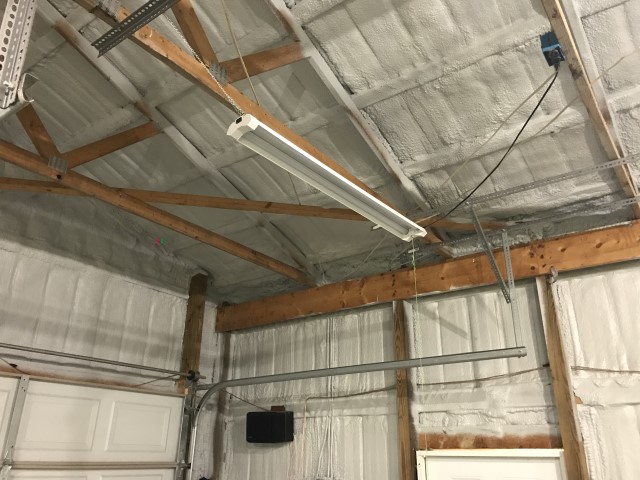
That is one exciting shop light!
My accountant and lawyer helped me set up a triple-net lease agreement between myself and my company (I get to break my own knee caps when I don’t pay up). Once that was official, and the insurance was in place, I opened the doors.
Flooring
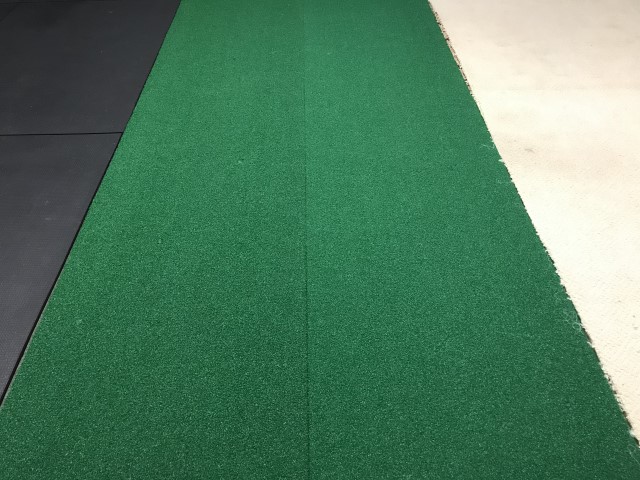
Horse stall mats (left), sled turf (center), and carpet (right).
The exposed concrete foundation of this building, as solid as it is, needed to be covered up; not only for function, but aesthetics as well. The previous owner’s boat and tractor had left oil stains all over the place, and my cats had spent the previous five years executing scores of birds and mice in every corner of the building. Concrete blood stains proved to be very difficult to remove, so I chose to literally sweep them under the rug (the majority of my clients aren’t serial killers, and probably wouldn’t want to be reminded of death while feeling close to it themselves).
Traditional gym floors can be very expensive, so I went looking for an alternative. I came up with 3/4″ 100 lbs 8×4′ horse stall mats. The Internet told me that they’re just as effective at shielding the concrete from dropped weights as commercial gym flooring, and a whole lot cheaper. So far, the Internet has been right. I picked up eight sections of the stuff from my local Rural King, and dragged it into place.
Cutting the mats around my power rack was a royal pain, but other than a bruised and blistered thumb, I have no complaints.
I wanted the centerpiece of my gym to be a sled. Until this point, I had never owned one, let alone used one, but I knew I had to have one (I have not been disappointed; more on that later). I did a ton of research on sled/prowler surfaces. I found that a quality sled can be pushed on just about any surface, but to get the most life out of the equipment, and the best training experience, it’s hard to argue with indoor turf.
The only argument I could come up with was price, and it was a pretty freaking great argument; this stuff is so expensive. I almost pulled the trigger multiple times on thin outdoor patio carpet, but couldn’t bring myself to install janky material that I knew would look like crap, and only last for a few months. I finally decided to buy a strip of OnDeck Sports’ 3×30′ turf.
This single strip alone set me back $350; I was sick about it…so you can imagine how violently ill I got when I realized that one strip wasn’t going to cut it (when going full steam, the sled constantly slipped off the turf…surprisingly, lifting a 400+ lbs sled back onto the track gets old after a while). After painful deliberation, I ordered another strip from OnDeck Sports, which gave me a much more usable 6×30′ total sled surface.
As it turns out, this was money well spent. I installed the turf with commercial-grade double-sided carpet tape directly to the concrete once I got it in place, and it has been bulletproof ever since. Whenever the cost pops up in my mind, all I have to do is look into my clients’ pale white glistening faces to appreciate the joy that has blossomed from the investment.
To complete the flooring triple alliance, I installed some old carpet, which I inherited from my in-laws’ family room. I had it stashed in the basement for three years, and I’m glad I hung onto it. I decided to finish the space with carpet, as opposed to more stall mats or extra turf in order to offer a softer surface for ground work. I’m in the business of providing a pleasant experience, and offering a nice cushiony surface for ground-based core work, foam rolling, and select plyometric training is the least I can do. I also believe it will extend the life of my slam balls…plus it was free.
Other Building Features and Considerations
Hills
My family and I absolutely love our yard. We’re relatively secluded (I can pee off my front porch while shooting a gun…recent double-blind, peer-reviewed clinical studies have demonstrated that gunshots scare away UTI’s and prostate cancer); bordered by a tobacco field, patches of forest and a large creek. Also featured on the property is a long continuous hill that runs almost 200 yards from the creek to the top of my driveway; of course, the gym is strategically located right on its path. When the weather is nice and spirits are high, you can often spot happy patrons running and/or dragging kettlebells and hauling sandbags up and down this majestic piece of natural exercise equipment.
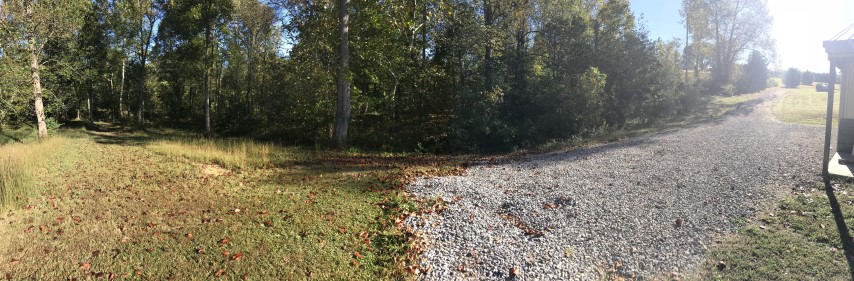
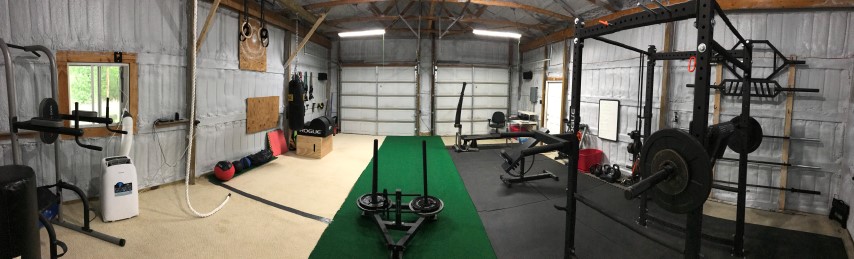
Panoramic shot of the hill and parking lot.
Parking
I don’t insist that my clients walk or bike to my gym to train (though it certainly sounds like a fun idea), so a parking solution is mandated. I kept it cheap and simple, and hired a dump truck (specifically, the truck’s driver) to create a parking lot from 15 cubic yards of #4 rock. I’m sure I’ll have to top it off every couple years, but so far, after four months of continuous daily use, it’s held up great.
Activity Beam
I don’t really know what to call the 15′ 4×6″ piece of wood bolted to the 2×4″ rafters; “activity beam” sounds nice. Connected to this large ominous beam floating above everyone’s head is a climbing rope, my Rep Fitness rings and an Everlast heavy bag. I had my extremely handy friend, Kent, help me install it so that people wouldn’t die.
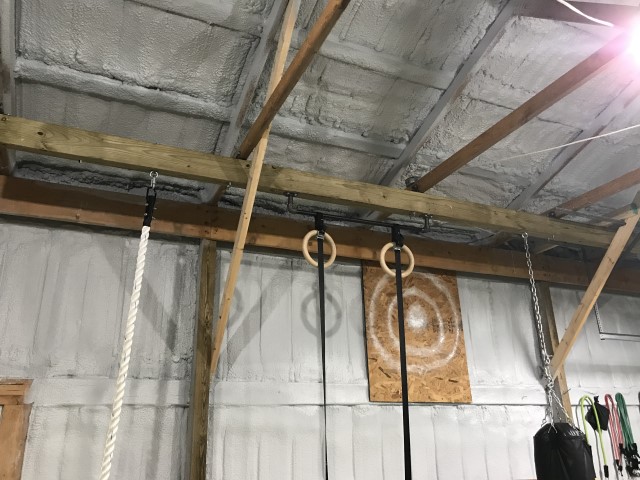
Climbing rope (left), wooden rings (center), and heavy bag (right).
Here’s a picture of Kent and I putting it together. It was a long process that required a nap.
Barbell Rack
At the moment, I have six barbells (more on those later), and considering the limited real estate, I want to keep them off of the floor. My wife and I simply put up two 8′ 2×4″‘s, and drilled bike hanging hooks into the wood. This has proven to be as elegant as it was cheap. The heaviest barbell is my EliteFTS SS Yoke bar (65 lbs), and the hooks keep it stable without issue.
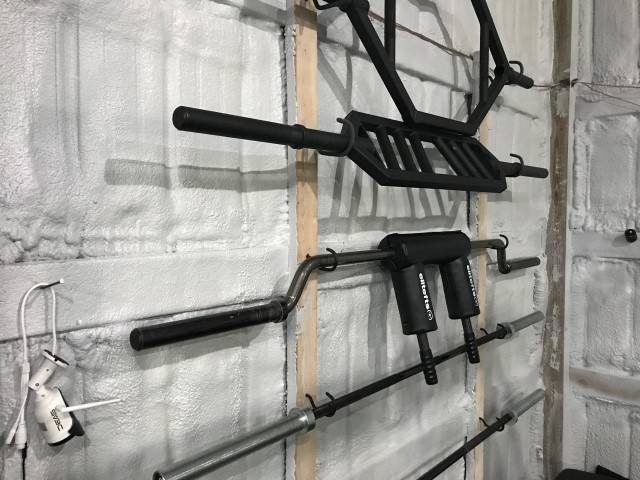
My DIY barbell rack. 2×4″s and bike hanging hooks…cheap and easy.
Music and speakers, etc
I pulled my old Denon receiver and Bose 301’s out of retirement. They hadn’t been turned on since college, but I was happy to see they still offer more bump than you would ever want to have in a tiny little space. I left the wiring exposed. It keeps it easy to manipulate, and seems to work with the decorative ambiance.
On a side note, the spray foam insulation made a huge difference in sound containment. Before I had it installed, Dr. Dre could be heard across the county while I was working out; now there’s just a slight muffle outside (but still enough to keep the average crowd jumpin’).
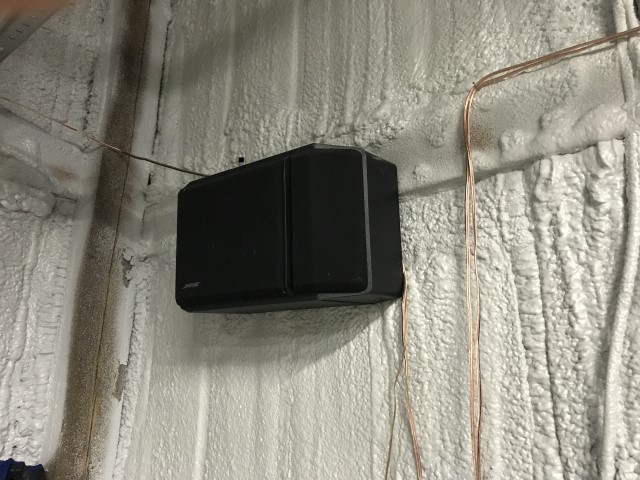
One of the four 20 year-old Bose 301 speakers.
Other stuff
I also installed a lock on the door, a solar-powered motion sensor light outside, a white board, and a Wilson cell phone signal booster (the steel barn is basically Faraday cage, so this was an absolute must). I did all of this by myself, and if you aren’t impressed by that, we can’t be friends.
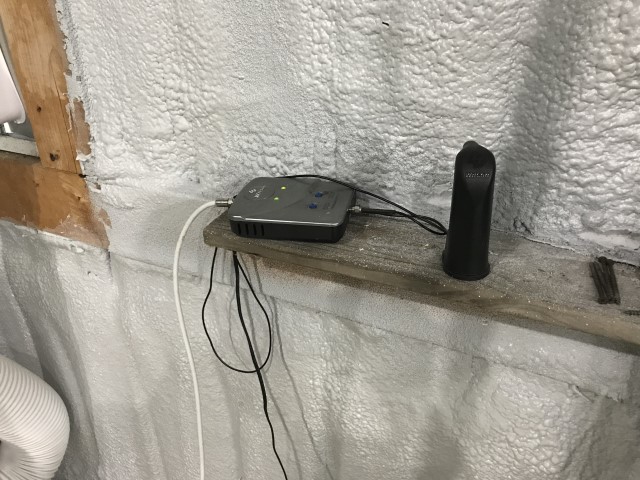
My Wilson 3G cell booster.
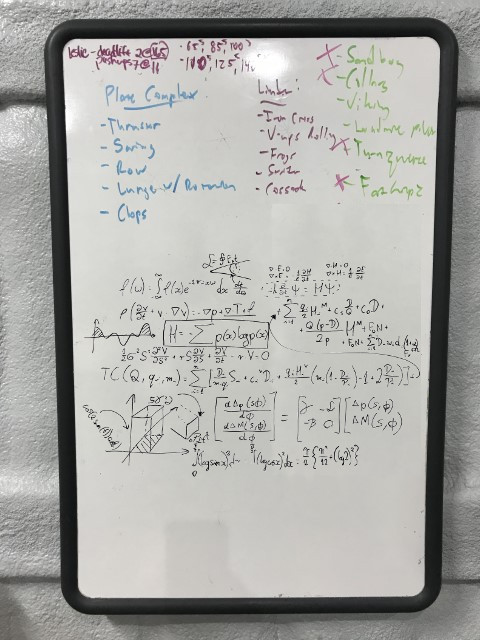
Oh that? That’s just my whiteboard with some of the math that I do on it…I was trying to solve for “swole”.
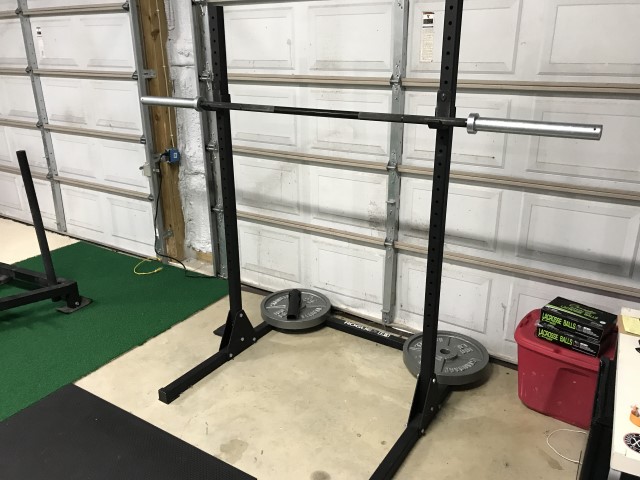
Power Rack
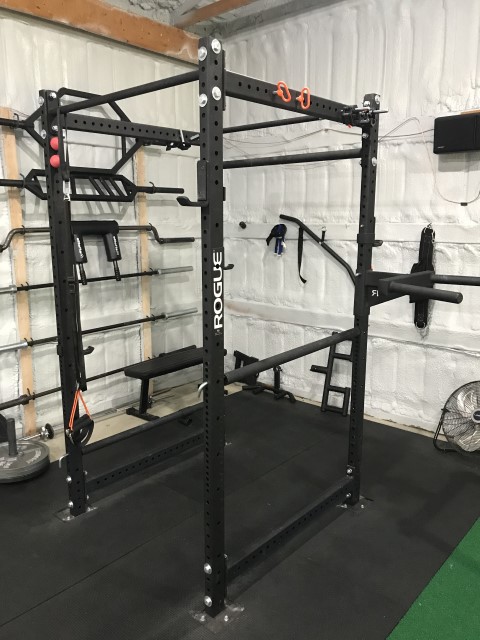
Rogue R4 power rack with the Matador dip bar attachment.
If you have a gym–whether garage or commercial–and you’re training people (including yourself), you pretty much have to have at least one quality power rack. Even if you’re not having people squat, bench, or rack pull, etc (i.e., all the staple power rack-associated exercises), it still comes in handy. In fact, only ~20% of my current clients actually perform any of the aforementioned barbell exercises, yet I routinely have two to three people working on the rack simultaneously.
It serves as an anchor for barbell push-up and row variations, suspension training (e.g., WOSS and TRX), pull-ups, resistance bands, and a thousand other exercises. I would go as far to say that, as a trainer, a solid power rack is a worthy investment, even if you don’t own a single barbell, or at least access to a good jungle gym (real talk). Having said all that, plenty of barbell work also gets done on this beast
After careful deliberation, I chose the Rogue Fitness R4 to be my first rack. I go into exhausting detail in the video below on all of its features as well as my experience using it thus far, so I’ll try not to be too redundant. In short, it fits my space, my budget and nearly all my needs (though I ended up getting a small squat rack as well for overflow; more on that below).
I bolted this 250+ lbs steel structure to the concrete using Rogue’s anchor kit (which literally consists of 12-3″ bolts). I used a utility blade to cut through the mats (which again, sucked), and a commercial hammer drill to make the holes in the concrete (which was awesome). This thing is not going anywhere, ever.
Power rack accessories
I also picked up a few accessories to plug into the Infinity attachment form factor. These Infinity attachments offer Rogue R series owners a very custom experience.
First, I picked up an extra set of J-Cups. I know $65 may seem like a lot to pay for two small pieces of steel, but they’re incredibly well made, can hold at least half a ton each, don’t scratch up my barbells, and because I train multiple people at once, I had to have them.
Shortly after, I decided to purchase the Matador dip bar attachment. I absolutely love this thing, as you can easily tell in the review below. I swear I’m able to bust out an extra rep or two each set, just from it’s raw rugged energy. If you have a Rogue rack with Infinity fittings, get the Matador. It’s better than whatever you’re currently using for dips…if you get bored with it, just fasten it to your head and chase drunken Spaniards through the streets.
I also picked up Infinity mounted plate storage, as the R4 does not come natively equipped with a place to hang your weights (you’ll want the R6 for that). This was one of the few purchases I semi-regret. It wasn’t terribly expensive, and it’s very well built, but it renders over a foot of post space completely unusable. If I was only training one person at a time, this wouldn’t be an issue, but there are times when I literally have three barbells going at once (I know that seems impossible with the configuration, but magic happens in these walls), and any available holes are a precious commodity. It still gets used, however. I just have it on it’s back next to the rack; it stands up well with a couple 45’s on it.
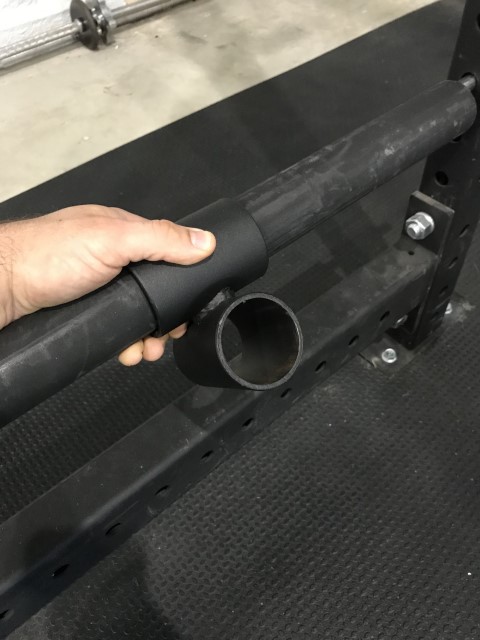
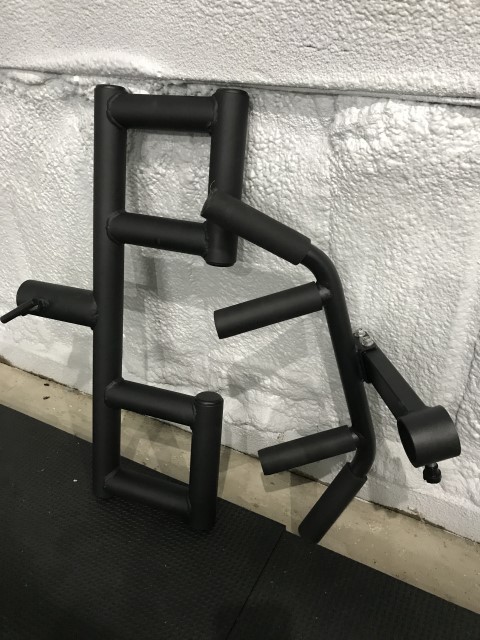
Finally, I bought the Rogue Echo Glute Ham Developer (GHD; more on that below), which can plug directly into any of the four rack posts. I rarely use this configuration because it interferes with the prowler path (it’s not uncommon that I have someone pushing weight on the turf while someone else is using the GHD). That said, if you’re training solo in your garage or basement, you probably won’t have this issue to contend with.
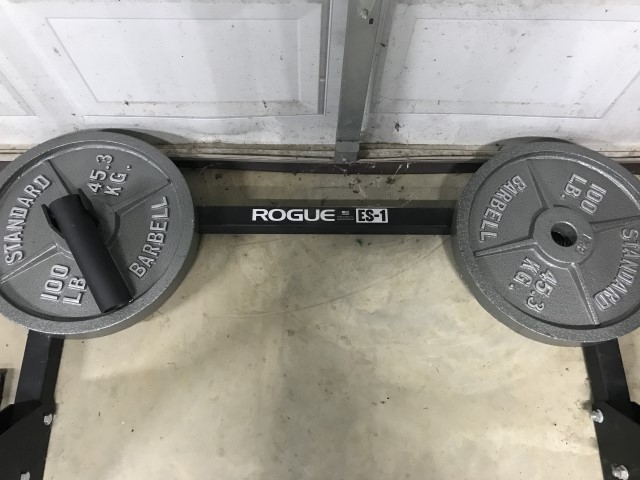
Squat Rack
Rogue ES-1 squat stand with 100 lbs plates on the base.
I friend of mine, Jake, decided to turn his garage gym into a machine shop, and gave me his Rogue Echo ES-1 squat stand (Thanks Jake!). Absolutely zero bells and whistles on this thing, but that’s not what I was looking for anyway (and definitely not what I expected to get for “free.99″). It’s free-standing, which is nice for portability’s sake, but I decided to reinforce the base with 2-100 lbs Olympic plates anyway, as I routinely have people performing barbell push-ups and band rows on it. The posts are only 2×2″ (compared to the 2×3” R4 and comparable S series), but with a tested 1000 lbs rating, I’m not terribly concerned.
As mentioned in the video review, about the only thing I don’t like about it is the bare metal J-cups; they have the tendency to wear down barbell knurling. Other than that, it’s simple, plain, and perfect for what I need. If you’re looking for a cheap, sturdy squat solution with a small footprint, this is your guy.
Benches
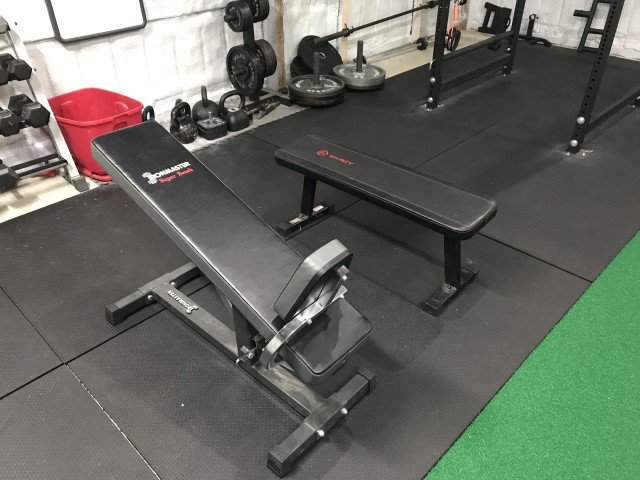
My Ironmaster Superbench (left) and Marcy flat bench (right). They don’t normally get along, but I got them to play nice long enough for the picture (I had to bribe them with a trip to the soda shoppe afterward).
Benches are another critical piece of equipment. Even if you don’t plan to perform many press variations in your gym, they have so many other applications. I use them for row platforms (everything from classic one-arm dumbbell rows to chest supported rows and flys), step ups, box squats, hip thrusts, and deep stretching surfaces; they also make half decent equipment stations for circuits, and seats for tired hineys (I hope I made you a little uncomfortable with that word).
I currently have two benches in my gym. One is the ridiculously versatile Ironmaster adjustable Superbench, and the other is a Marcy flat bench.
Ironmaster Super Bench Adjustable Bench
The Ironmaster model is basically the Swiss Army knife of benches. There are around a dozen different attachments that can be hooked directly to the bench; everything from leg extensions gear to a standalone lat pull down machine. I don’t currently have any of the extra attachments, but I my sights are on a couple for the future. I mainly bought it for it’s solid structure (the bench itself is 75 lbs, and supports 600 lbs at an incline, and 1000 lbs flat), its 11 adjustable angles, and its glowing reviews.
My only problem with it, which you can hear all about in the review below, is that it’s a bit too tall for an ideal barbell bench press. I’m almost 6’4″, and I have trouble planting my feet for a heavy press. It’s easily fixed by putting a couple yoga blocks under my feet, but I usually just bench on the Marcy, since the alternative is readily available.
Marcy flat utility bench
The Marcy flat bench is very lightweight in comparison to the Superbench, and only has a max capacity of 600 lbs. Of course, at $60, it’s a fraction of the cost (I happened to get it for free from a friend who didn’t have room for it anymore…he was gonna put it down…I rescued it). I’ve put the 600 lbs capacity to the test; I actually surpassed it by 20 lbs (a 370 lbs bench + my 250 lbs body weight), and it didn’t melt! It’s certainly nothing special, but it gets used multiple times a day, and it’s still in great shape.
Prowler
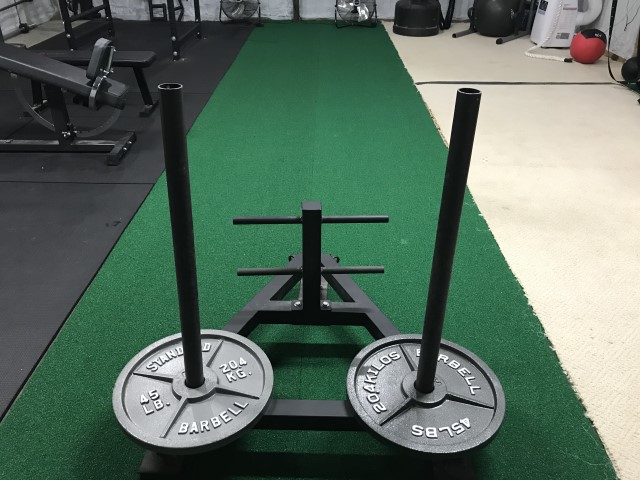
My Rep Fitness Prowler. He’s only a few months old, but the poor thing has already seen untold carnage.
I use the term “prowler” and “sled” interchangeably, though that’s probably irresponsible of me. Technically, the difference is that a prowler can do everything a sled can, but you can push it from multiple angles as well. I really really wanted to push some heavy weight, so I spent a little extra money on a prowler instead of a sled.
I went with Rep Fitness’ prowler. It’s one of the single most used pieces of equipment in the gym. Of the three dozen or so people who have worked out in this gym since the opening four months ago, at least three dozen or so have pushed, pulled or dragged this beast as part of a workout (you read that right). It allows you to load up very heavy on the legs and core with incredibly low impact on the knees and back (almost zero eccentric force). Also, it’s a murderous piece of cardio equipment. I’ve worked it into a million different finishers, and it’s undefeated.
I admit, I don’t have much prior experience with prowlers, so I don’t have too much with which to compare this model. That said, I’ve always been satisfied with Rep Fitness gear, and for the price, I was confident I wouldn’t be disappointed.
It’s extremely versatile. You can do just about every movement imaginable with it, and though I normally just wrap my WOSS suspension rig around the front pole for drags, it also comes equipped with multiple caribeener holes as well. Love this beast.
Barbells
Some scientists argue that in order to perform barbell exercises, you need at least one barbell. This debate puts me on the fence, but I can say wholeheartedly that a nice assortment of barbells is a solid investment for a gym; it has been for mine anyway.
I don’t have much space or money, so expensive specialty machines with massive footprints are completely out of the question. That said, even with limited mobility restrictions, there aren’t many movement patterns and muscle groups you can’t effectively (and safely) train with the right barbells. I started off with six, and while I have a couple on the wish list, I’m very satisfied so far.
Rogue Ohio Power Bar
I ended up getting three straight Olympic barbells in total, and I’m glad I have the extras. From the “big three” lifts (deadlifts, squats and bench presses, and all of their variations) to barbell push-ups, row movements and complexes; from landmine exercises to mobility/smashing routines; I use straight barbells for everything.
I’ve been to too many gyms with permanent bows in their cheap barbells from heavy squats and deadlifts. I’ve even seen one snap in half. If you haven’t seen either of these phenomena, you either need to start going to a gym where the patrons work hard, or you need to thank the owner of your gym for buying quality equipment.
I wanted at least one bar that would last forever. I went with the Rogue Ohio Power model, a bar built for heavy powerlifting that’s guaranteed to perform.
I briefly considered a hybrid or true Olympic bar with extra whip and super “spinny” sleeves, but I don’t really do any serious Olympic-style lifting (yet), and figured my money would be better spent on a powerlifting bar. When I first got it, I treated it like it was a valuable baseball card or something, and only used it for deadlifts, squats, and bench presses. After a couple weeks though, I realized how bulletproof it is, and have sense thrown it in the mix for everything (but it’s still the only one I use when I’m personally training heavy). The review below pretty well covers my opinion, as well as all the features of the bar.
Rogue Beater Bar
I also picked up a Rogue Beater Bar. The Beater is just a solid all-around, nothing fancy, but nothing cheap; kinda cute, but not drop dead gorgeous barbell (at least that’s the product description on Rogue’s site). Sadly, Rogue no longer produces the Beater Bar; I must have gotten one of the last runs. The good news is they replaced it with the Echo 2.0, which I understand, for only a few bucks more, is actually a slight improvement.
Some crappy old rusted barbell that despite the mean things I have to say about it, I’m still glad I have it, and use it all the time
I also bought a crappy old rusted barbell from a friend of a friend who was selling a bunch of old weights that had been sitting outside for a few years. Despite all the mean things I have to say about it, I’m still glad I have it and use it all the time. I took an hour or so to knock off all the loose rust with a steel grinder and a white vinegar solution. After refinishing it with some clear gloss spray lacquer, it actually cleaned up pretty nicely.
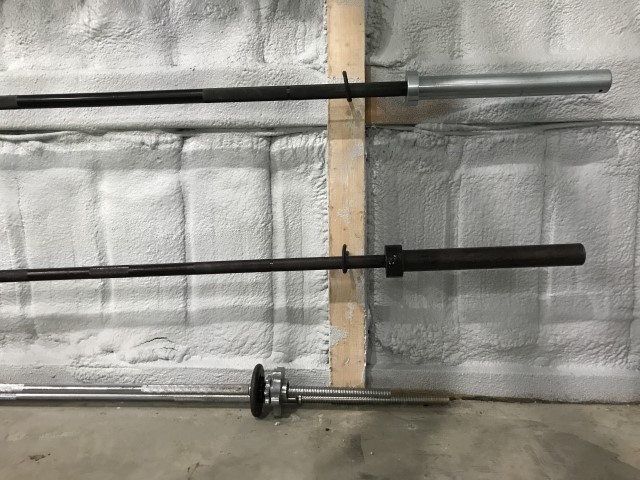
The Beater (top), the crapper (bottom), and some old 1″ bars (very bottom).
EliteFTS SS Yoke Bar
The “SS” stands for “Shoulder Saver”. That’s precisely why spent big money on this beast. I have a lot of clients who have poor shoulder mobility, and while they could benefit from a loaded squat (they have the proper lower body strength, core stability, and hip mobility), their shoulders don’t allow them to get establish a snug fit under the bar. Selfishly speaking, there are also plenty of times when I want to baby my shoulders when I squat. It’s times like these when I’m glad I have my Yoke bar. Mobility limitations aside, there are also over a dozen other squat, hinge, and press variations that can be performed with this bar.
EliteFTS doesn’t screw around with quality construction. The bar is 65 lbs of cambered beastliness, and the padding is built for durable comfort. The price was a little steep at $400, but truthfully, I’d spend $600 on this bar if I didn’t know better. It’s irreplaceable.
Black Widow Multi-grip Angled Swiss Bar
I’ve heard that the Swiss bar’s namesake derives from their versatility; mirroring that of a Swiss Army knife, if you will. No idea if the etymology is true, but the comparison certainly is. This bar gets used more often than not for press variations (it’s easy on the shoulders, and recruits the triceps intensely), but it also routinely sees action in the form of row variations, curls, tricep extensions, pull-ups (fits nicely on top of the R4), and barbell push-ups.
Though the straight neutral grip handles are also a viable option (and I may get one in the future as well), I’ve found that you can squeeze a little more variety out of the angled bars (especially in pulling variations), and still reap the shoulder-safe benefits that the neutral bar provides. Another huge perk of this bell is that it serves as a semi-comparable substitute for dumbbell presses. My dumbbells currently stop at 40 lbs, but I’ve found I can closely mimic heavy dumbbell presses by using the bar’s pronated grips.
Wouldn’t trade this bar for anything (unless it was for two of them, or maybe a portable machine that turns burps into farts, plus a machine that turns farts into world peace).
Black Widow Trap Bar
Trap bars (i.e., hex bars) also have a million different uses. I primarily use mine for deadlifts, shrugs and carries, though with a little ingenuity and smart collar placement, I’ve also been able to rack it for overhead presses.
As implied, this particular bar can’t be easily racked in a standard cage (though Black Widow does make a rackable model as well). Also, the inside isn’t quite spacious enough to perform split squat or lunge variations. That said, the bar was inexpensive, and, like all Black Widow stuff, put together extremely well. Other than those two downsides (which, might I add, can be easily remedied by purchasing a bigger model), I have no complaints.
Collars
I currently have two sets of collars; both of them are IronLab heavy nylon clamps. Not much to say about these that I don’t mention in the video review below. They’re incredibly durable, versatile (they fit on every one of my barbells), and dirt cheap.
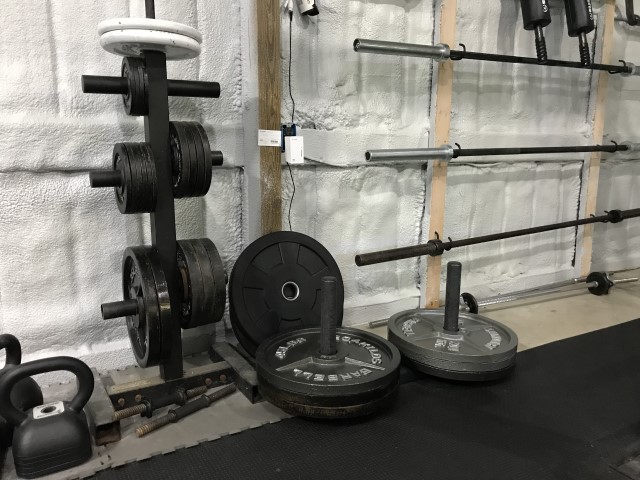
Plates
All-told (including the 1″ diameter units), I have almost 900 lbs of plate weight in this little garage gym. Of all the money I shelled out for this project, I probably skimped the most on plates. While I’m happy about the savings, I definitely learned a lesson or two.
I don’t compete in anything, or do much Olympic lifting, so exact specs and bounciness (or the lack thereof) weren’t important to me. So I figured, what else matters? Nothing right? Well, what I didn’t consider were the scratches that crappy, rusted garage sale weights could put on my pretty new barbell sleeves. By the time I finally got wise, and refinished the plates, some damage had already been done. Shame, shame, double-shame.
Now, from a utilitarian perspective, I’m quite pleased. My plate collection consists of the following:
- 2 brand new CAP 100 lbs plates I got from Amazon on sale for about ~$100/piece delivered
- 4 brand new CAP 45 lbs plates I also got from Amazon for ~$.80/lb. I tried to buy more, but they imposed a customer purchase limit the next day, and the price was jacked back up…I think I might have gotten lucky and exploited a clerical error or something.
- 2 new Rogue Hi-Temp 10 lbs recycled rubber plates (basically the press board equivalent of a bumper plate)
- 200+ lbs set of old, beat up CAP 2″ Olympic bar plates that I got for $100 with the stand and aforementioned barbell. Great buy; I just wish I refinished them BEFORE I used them on my new barbells.
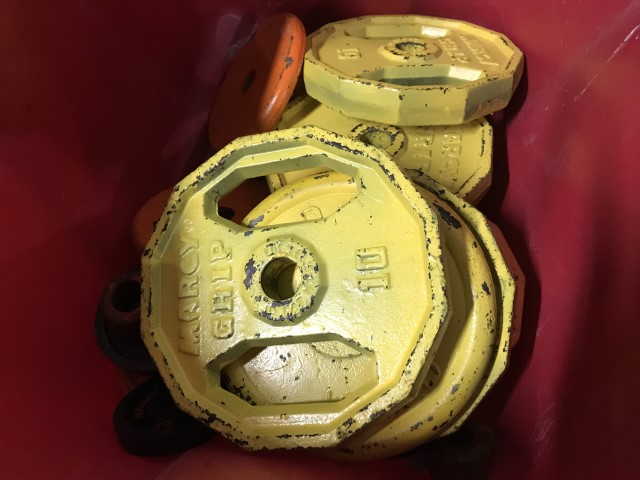
- 150+ lbs of old 1″ barbell plates I’ve accumulated from friends and relatives over the years. I completely refinished these and spray painted them silly colors. I use them all the time to add incremental bumps on the sled, and occasionally for heavy dumbbell rows.
The used plates and Rogue bumpers
A few of my old 1″ plates I use for various activities.
The two 100 lbs CAP plates. I occasionally bust them out for super heavy deadlifts and sled work, but they spend most of their time holding the ES-1 down.
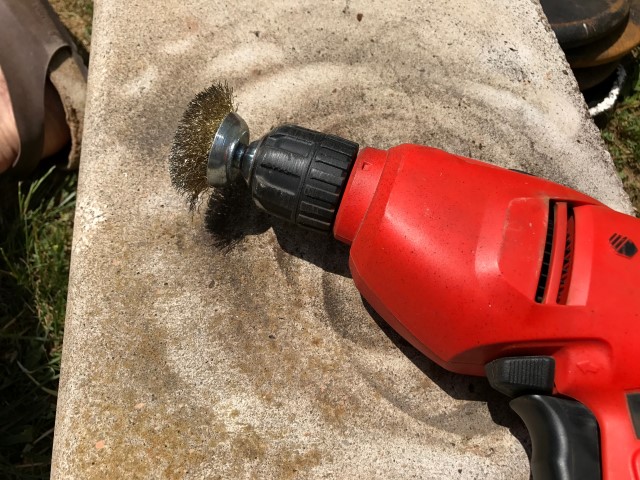
Knocking all the rust and literal garbage off of the old weights (1″ and 2″) took some some time, but once I got the assembly line rhythm going, it went quite well, and I was very pleased with the fruits of my labor. For those of you who want to tackle this at home. Here’s the gist:
- Get some safety goggles and a mask. Things get nasty.
- Get a steel grinder bit for your power drill
- Grind off all the rust and crap growing on the plates
- Fill up a large vessel with a 5:1 water-to-white vinegar mix (doesn’t have to be a perfect mix…almost any bit of vinegar will do the job if you let it sit long enough).
- Let all the plates sit in the mix overnight.
- Pull them out, rinse them off with water immediately and let them dry.
- Coat them with lacquer or spray paint for added protection (not seen below).
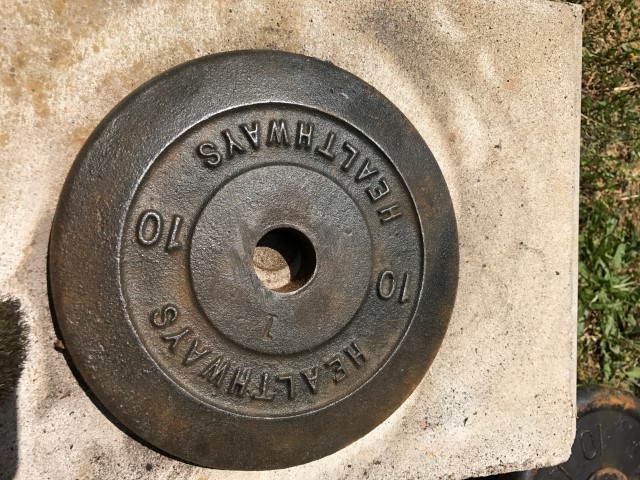
Here’s a fine “before” specimen.
Grinder bit.
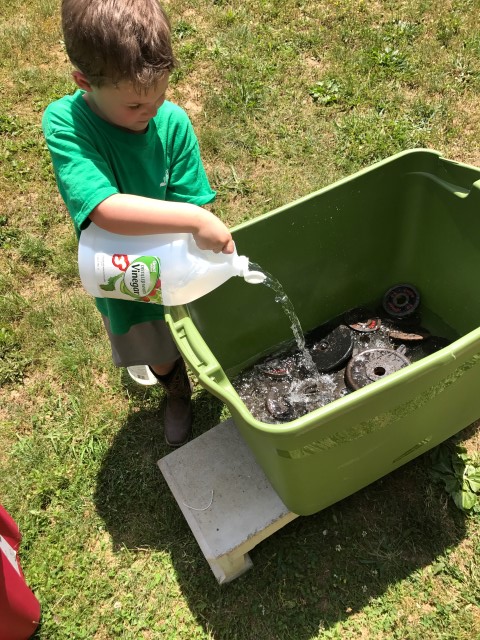
Great project for your kids…mamamamamake gainz like this!
All better now.
Landmine Stuff
I originally purchased the landmine grappler from Black Widow only because they offered it to me as a super cheap purchase add-on while I was checking out my Swiss bar. I had used them previously a handful of times, and thought–considering the relatively low cost and nearly zero spacial footprint–it might be a fun little addition in the garage. I have since fallen head-over-heels-in-love with landmine exercises, both as a trainer, as well as an fitness enthusiast. Right now, our relationship is just common law, but I hope to see a big turnout in the polls when the landmine-human marriage act hits the Ohio ballot next year (don’t look too far into that…I’m not making fun of anyone…I’m just being an idiot…relax…come here, and give me a hug…now, what’s there to be upset about? Wait, is that a smile I see? It’s a beautiful day outside…go play).
I tend to think of landmines as a poor man’s training solution for those who can’t afford machines (I know I said the same thing about barbells, but that didn’t really make much sense…this totally does). They offer a smooth, guided range of motion for every loaded movement pattern, and with all of the available accessories, there’s almost no machine movement that can’t be mimicked; dare I say, even improved upon!
Black Widow Training landmine grappler
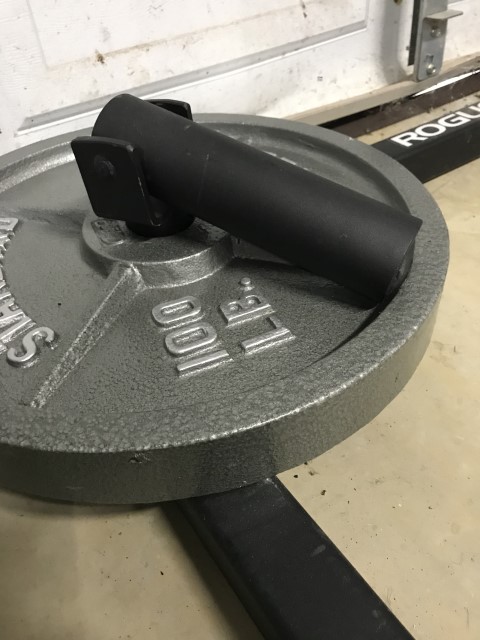
The landmine attachment dropped in a 100 lbs plate in the corner of the squat stand.
This was the piece of landmine equipment that opened my eyes. The grappler is simply a super solid cylindrical piece of steel that drops snugly into a 2″ Olympic plate hole. It can be used as a base for landmine exercises virtually anywhere you can lay down a 45 lbs plate. I spoke with Dean from Black Widow after writing the review linked above, and he said the best way to use the pivot point is to drop it into a stack of two plates; a standard 45 pounder on top of a rubber bumper plate. I’ve since adopted this configuration, and it works quite well. In addition, I keep it inside one of the 100 lbs plates that hold down the ES-1 squat stand, which also works just terrifically.
Black Widow Training pin pipe pivot landmine base
Black Widow landmine pin pipe pivot point…tongue twisters are silly.
This little piece of equipment is absolutely brilliant, and a must have for anyone with a pin pipe safety power rack (like my Rogue R4). The pivot point slides over the pipe, and voila, you have a landmine base to work with. It takes up absolutely no space, and never gets in the way. I just leave mine on, whether I’m using it or not.
I got this little addition so I could have two landmine users going at once if necessary. The only downside is you’re limited to up-and-down movements (no side-to-side). Other than that, it’s perfect.
Black Widow Viking Press landmine attachment
Viking press bar (left), generic multi-grip row bar (right)
The viking press bar is one of my favorite pieces of equipment in the gym. It’s versatile, beastly, and I just bought it, so it has that sweet novelty flavor. For being such a unique attachment, it has a huge number of uses; several press variations (neutral and straight bar), curls, front squats, and even back squats (one of my clients showed this variation to me; it feels very similar to squatting on a Smith machine).
Multi-grip landmine row bar attachment
This little attachment (pictured above) is about as generic as they come. I tried to find the name of the manufacturer, but it’s nowhere to be found on the bar or my order receipt. In fact, Amazon (where I bought it), doesn’t even sell it anymore. Having said all that, it works. I’ve rowed 250 lbs with it using both handles, and it has held up well. If I ever find the name of it, I’ll be sure to let you know.
Dumbbells and Kettlebells
Dumbbells
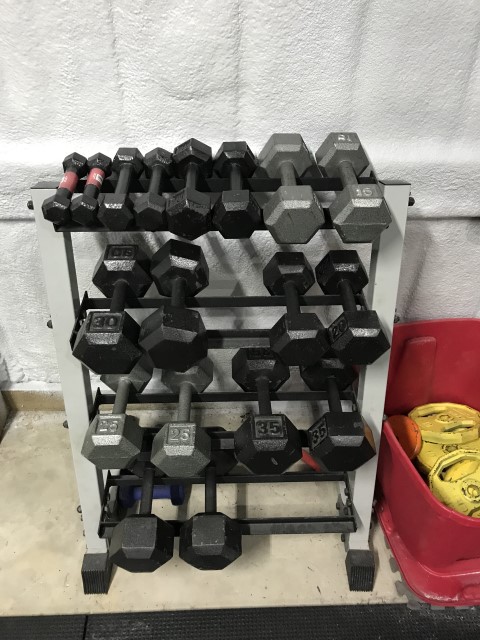
My hex dumbbell rack (up to 40 lbs).
My dumbbell selection isn’t terribly impressive; it only goes up to 40 lbs, and they’re just plain old hex bells. That said, my clients and I use them constantly for shoulder work, high rep rows, curls, flyes, presses, and 78 million other exercises you can do with dumbbells. As I mentioned earlier, I currently swap in the Swiss bar in place of heavy dumbbell presses if my workout calls for it, and use my kettlebells for heavy single arm exercises.
While heavier dumbbells are on my wish list, I’m pretty content with what I have right now; they were totally free (my parents gave them to me from their house…didn’t get much use from those bums), and, as illustrated, I have plenty of workarounds to make up for the relatively light weight.
Kettlebells
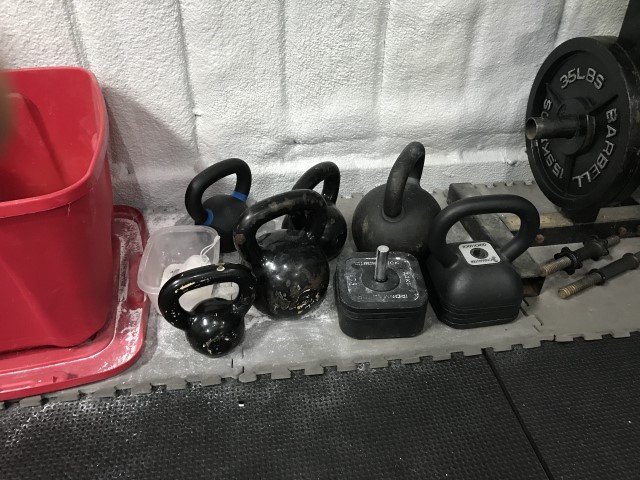
Don’t you just want to squeeze their cheeks!
Like most American fitness enthusiasts, I was late to the kettlebell party. Until about three years ago, I had never even touched one. Now look at me–just look at how much I love these cast iron little pals of mine. I struggle to think of a program I’ve done since I started using kettlebells that doesn’t involve them; at the very least, as part of the warm-up.
CAP Kettlebells
I have a decent assortment of bells–at least enough to successfully challenge any movement I desire. I have the following in my arsenal (If you’ll notice, I’m too good for the metric system…you’ll never take my guns or my inches):
- 15 lbs CAP enamel kettlebell
- 26 lbs CAP Competition kettlebell
- 35 lbs CAP enamel kettebell
- 60 lbs CAP enamel kettlebell
- 80 lbs Rogue Competition kettlebell
- 22.5 – 80 lbs Ironmaster Adjustable Kettlebell
Ironmaster Adjustable Kettlebell
“Mobility” Stuff
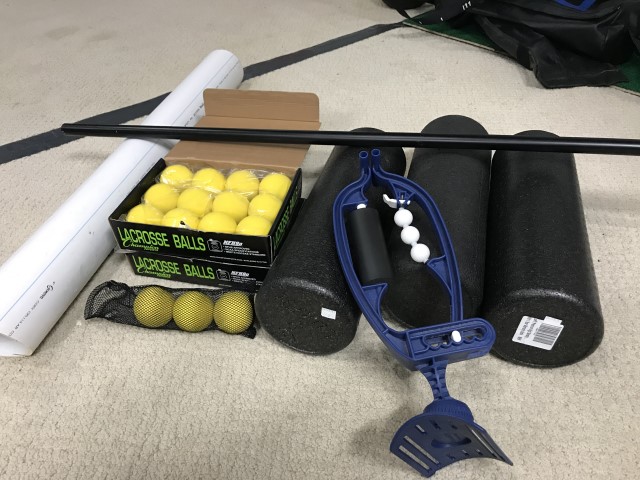
Lacrosse balls, foam rollers, dowel rods, PVC pipes and an Arm Aid…the face of true comfort.
I’m really just using “mobility stuff” as a catch-all buzzword for equipment that helps you achieve greater range of motion without pain (the definition of mobility goes much deeper, but we’ll stop there for today). What you mainly see in the picture above is a bunch of gear that’s primarily used for self myofascial release (SMR), or soft tissue work; like giving yourself a deep tissue massage.
Side note: if you’re interested in some a ton of exercises, all of which you can perform with a lacrosse ball, check out my Mobility Exercises Table.
Here’s a list of most of the mobility equipment I own (I’m sure there are dozens of other things scattered around the house that I’m forgetting):
- 24+ Lacrosse balls (I give them out to all my clients, so I keep a pretty heavy supply)
- 1 pair of Mag Mobility balls
- 4 foam rollers
- 2 PVC pipes (for the masochists)
- 2 rolls of Voodoo Floss
- 1 Arm Aid
- 1 Marc Pro Plus
- 1 Theraband
- Tons of bands and sticks that can also be used for a million other exercises
Arm Aid
Marc Pro Plus
Mag Mobility Balls
Everything Else
Rogue GHD Echo

GHD roller assembly attached to “The Strip”.
There’s no substitute for a good glute-ham developer (GHD). Ok, maybe there are two million substitutes, but a GHD is certainly one of the most effective pieces of equipment available for developing a great-looking, feeling, and working posterior chain. Needless to say, I had to have one.
After considering my options, I opted not to get a standalone machine, as they take up a lot of extra space. The Rogue Echo model was just what I was looking for. I can fasten the pad to my 30x24x20″ plyo box (my in laws made it for me. Thanks Howard and Judy!), and the foot roller assembly to my power rack or Rogue “Strip” (a 2×3″ piece of 11 gauge steel bolted to a 4×6″ that allows connections for all my Rogue Infinity attachments). For a quality GHD, it is as portable as you’re going to get.
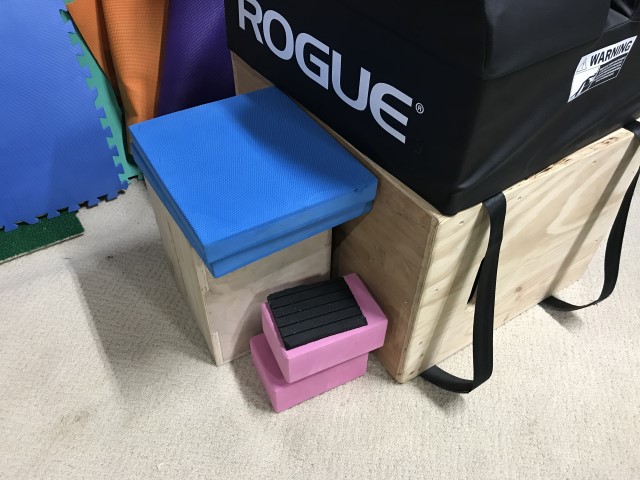
The GHD pad fastened (barely) to my plyo box. Also pictured is a little baby plyo box made by Rep Fitness and some Airex pads and yoga blocks.
Resistance Bands and tubes
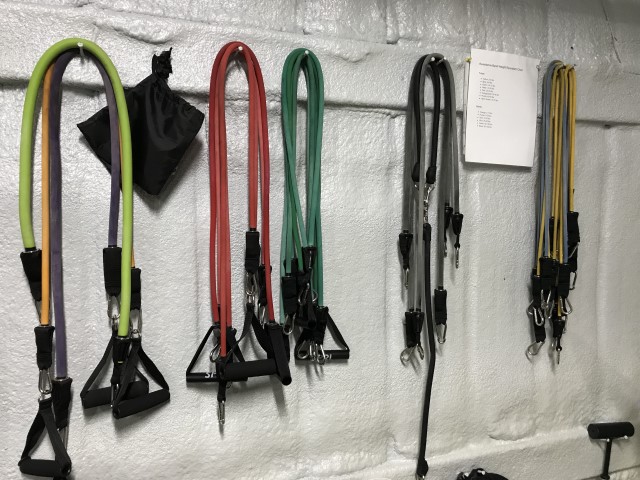
Black Mountain and Spri resistance tubes.
I can do more exercises with my bands and tubes than probably every other piece of equipment in my gym combined. I use them for warm-ups, mobility exercises, work sets, heavy accommodating resistance sets; I take them with me when I go on vacation; and when I train people at other gyms, I usually have a set on me (they’re a great, cheap, lightweight substitute for cable-pulley machines, so I often sub them in when the machines are occupied).
Don’t worry, meathead Mike, you can still get plenty of a pump using bands and tubes if you don’t have iron lying around. I have single tubes with up to 75 lbs of resistance, but you can combine them for even more weight. I do this as a substitute for lack of a lat pull down machine; I throw several heavy bands over the power rack pull-up bar, and clip them to either a pair of handles, or my Anazao band pull down bar. As for the bands, my Serious Steel black band offers over 150 lbs of resistance. You can use them to either make every exercise easier (e.g., pull-ups with a band attached to the bar) or harder (push-ups with a band over your back). These things are too inexpensive and effective not to own.
Serious Steel resistance bands
Everything else…else
I’m not going to go into great detail on all of the other miscellaneous equipment I have in here, not because I don’t like it (it wouldn’t be in the gym if I didn’t), but because this post doesn’t need to be another 7000 words. Here’s a list of everything else I can think of, and a few relevant videos:
- 2 Plyo boxes
- 1 homemade (30x24x20″)
- 1 Rep Fitness (16x14x12″)
- 2 Yes4All “Airex” pads
- 2 furniture sliders
- 1 Gold’s Gym ab roller
- 1 12′ poly climbing rope
- 2 Fat Gripz 2.5″
- WOSS 3000 Suspension trainer
- 1 NEXPro 40′ battle rope
- 1 Everlast 70 lbs heavy punching bag
- 1 Wavemaster Heavy bag
- 6 quick release tourniquets (for occlusion training)
- 1 SKLZ Pro Mini basketball hoop
- 1 Bowflex machine
- 1 Lifestep Pro 7500 stair stepper machine
- 1 Weider leg raise, pull-up and dip stand
- 1 Harbinger dip belt
- 1 Swiss ball
- 2 Neuro grips
- 1 Ultimate Sandbag 80 lbs
- 1 Army duffel sandbag (170 lbs)
- 1 tractor tire with an assortment of tools occasionally used for training including a spud bar, sledgehammer, and wheelbarrow
- 2 yoga blocks
- 3 yoga mats
- 1 10 lbs medicine ball
- 1 30 lbs slam ball
- 1 10 lbs padded medicine ball
- 2 barbell straps
I think that’s about it…
Neuro-Grips
These are some brutal little pieces of steel to make push-ups ridiculously difficult. They demand maximum full-body tension. No cheating on these if you don’t want to face plant.
SKLZ Pro Ball XL Mini Hoop
Easily my favorite toy. I’d recommend this piece of equipment for any gym. I shoot on it all the time in between sets, and sometimes as a low intensity aerobic workout (i.e., LISS). Oh, and then there’s burpee P.I.G…
NEXPro Battle Ropes
I’m not very impressed by these battling ropes, as they’ve been falling apart since the day I got them. That said the 40′ length is perfect for the gym, and I’m determined to get my money’s worth. I’m going to beat these things until there’s nothing left to beat.
Rep Fitness Mini Plyo Box
Great little easy-to-assemble plyo box. I use it all the time to teach squats, perform step ups and heavy box squats.
Harbinger dip belt
I’ve been using this for several years now, and for the price, I can’t believe how well it has held up. As I mentioned in the video, I’ve had over 180 lbs hanging off of this thing. I use it every week for weighted dips, chins, and belt squats.
Ultimate Sandbag 80 lbs
This thing is such a freakin’ stud of a sandbag. It has heavy duty stitched handles everywhere, allowing a configuration for every lift, swing and toss imaginable. I don’t care if it’s more expensive than every other sandbag out there; it’s worth it.
WOSS 3000 suspension trainer
I use this thing all the time for classic suspension exercises (think TRX), but I get my money’s worth from it just as much from heavy sled work. It’s rated for 600 lbs, but I’ve definitely put it past that mark, and no one is the wiser. Great piece of equipment!
Hard and padded medicine balls and slam balls
Rather than spend $100+ on a really nice padded all-purpose med ball (e.g., a Dynamax), I decided to buy three different classes of average quality medicine balls, and restrict their usage appropriately in order to extend the life of my investments.
[activecampaign form=1]
Wish List
I managed to only go a few thousand dollars over my initial $5000 gym budget (sure would be nice if the $3000 spray foam insulation would at least spot me every now and then), but alas, I don’t have everything I want (and never will…meh!). Here’s a list of my likely future purchases in no particular order. If anyone has other suggestions or feedback, please share them in the comments below:
- Lat pull down machine with Olympic plate loading. I’m currently using resistance tubes anchored to my pull-up bar.
- Another WOSS suspension rig, or a comparable sled strap. Occasionally, I’ll have one person doing rows and another performing sled drags…waiting 15 seconds for the set to end is simply out of the question!
- More plates. I can always use more weight. While I always keep an eye on Craigslist and Facebook deals for used plates, it might be nice to invest in some quality bumpers as well
- 125 lbs Power Block or comparable Ironmaster adjustable dumbbells. As I mentioned, I’m able to workaround heavy dumbbell presses with my Swiss bar, and heavy carries with the trap bar, but it sure would be sweet to have a small 250 lbs adjustable footprint in the corner of the gym.
- <20 lbs kettlebells. These always come in handy for warm-ups, instruction, and light mobility work.
- Deadlift blocks. For folks with mobility issues (tight hamstrings, lower back, etc), I currently jack the deadlift bar up on 45 lbs plates, but boy, is it inefficient!; plus it robs me of plates, which are a precious commodity at the moment. I realize rack pulls would be a great workaround, but that would almost completely tie up the power rack, and with simultaneous users, that’s not an option.
- Black Widow T-Handle Swing bar. I know I have two 80 lbs kettlebells, but every now and then, I want to swing more (I got to swing the 200 lbs kettlebell at Rogue’s warehouse in Columbus, and the joyous memories have stuck with me ever since). Essentially, you load up Oly plates on this bar and take them for a ride. It can also be used for rows, belt squats, duck walks, and grip work.
- Mirrors for the pump chasers. They will also make the space look bigger. I’m on the lookout for some cheap mirrored closet sliding doors. Actual gym mirrors are sweet, but way more than I want to spend right now.
- Steps. The mini plyo box works pretty darn well, but for many of my clients, some exercises on a 12″ box are too difficult (low box heel touches, Peterson steps, etc), plus I can’t use it when someone is doing box squats.
- Curl bar. I know, what kind of self-respecting gym owner doesn’t already have an curl bar? One who’s content with his 18″ arms…ok, that was conceded. I have a dozen other tools in gym to isolate the biceps and triceps already, so I’m not really in a rush. I’ll probably get a nice EZ curl bar or a Supra bar with the rotating handles (probably both).
- Vertical leg press machine. Squat, deadlift and lunge variations can get you just about as far as you want in life (I’m pretty sure President Trump tweeted a 500 lbs triple-no A2G front squat last week), but leg presses are definitely king of the lower body assistance lifts. The vertical rigs aren’t quite as nice as their angled sled counterparts, but they’re much cheaper and tend to take up less space.
Visit the link below to sign up for a free 92 page issue of MASS Research Review (you can read my MASS review here) covering the following topics:
- Blood Flow Restriction Training Causes Type I Fiber Hypertrophy in Powerlifters
- Leave the Gym with a Little Left in the Tank
- Energy Availability in Strength and Power Athletes
- Hormonal Contraceptives Don’t Mitigate Strength Gains
- Power Training or Speed Work for Some, But Not All?
- The Role of Physical Activity in Appetite and Weight Control
- The Science of Muscle Memory
- VIDEO: Program Troubleshooting
- VIDEO Sustainable Motivation for Sport and Fitness